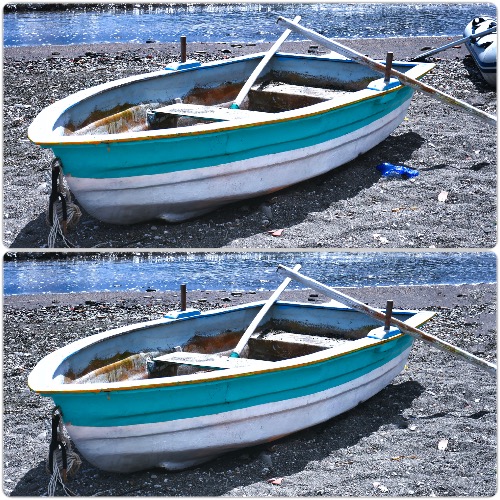
Today’s post is about how to remove objects from photos. In a previous post, I showed how I used Inpixio for removing backgrounds from images. Once you’ve removed the background you’re left with a picture with a transparent background which I’ve found to be extremely useful. I use these images in my videos as well as when creating my YouTube thumbnails using the Creator.
You can see how easily I’ve removed a cluttered background in my Removing background with InPixio Photo Clip video.
One of the comments on that video was from a guy who wanted to see how to remove objects from photos and how well Inpixio handled the task. Always ready to please my viewers I produced How To Remove People From Photos video.
How To Remove Objects From Photos Tutorial
That video was a virtual tutorial showing exactly how well Inpixio removed people and objects from videos. You will see which photos Inpixio flawlessly removed people and objects. You will also see what type of images caused problems for Inpixio. Knowing there would be some images that Inpixio would struggle with the developers included a cloning tool. The cloning tool helps to fix the issues on those photos that Inpixio didn’t produce the necessary result.

You will also notice that at the time of producing that video my MAC was running slow for some reason, and I couldn’t get the cloning tool to work correctly. I probably should have closed all the programs I had running and restarted my MAC so it would run better. Oh well, I’ll remember to do that next time.
How Removing Objects Helped Me
Helped me do what you may ask? If you haven’t heard of Dreamstime, it’s a Royalty-Free stock photography website. I’ve been a member for years, and I can tell you that it’s tough to get a photo accepted to Dreamstime. As they say on their website, “To ensure you receive the best content, all images are reviewed and approved by experienced editors.” And those guys don’t play around. Take the image above. I tried everything to get that image accepted.
The problem is when Dreamstime rejects a photo; they give you a standard rejection email, which instead of telling you the issue, they list all the possible issues. I almost gave up, but one of the problems was something to do with the subject matter. That’s when I thought I should remove the dingy and plastic bottle. Using Inpixio, I edited the photo removing the objects and uploaded the resulting image to Dreamstime. They accepted it. You can see that image here.
You May Find The Following Of Interest
You should check out my YouTube Channel. As you know I’m always looking for new subscribers so why not consider subscribing to my My Bonzer Channel. Of course, there’s also my latest A woman’s mind at work.
Of course, you know you can always get more laughs at my Friday Funnies posts, not to mention my Heaps Of Jokes.
Jokes aside I reckon you’ll like my latest video Luminar 4 Review which show just how easy it is to replace a dull sky for a truly dramatic one in your photos.

Thanks for sharing this cool trick. I am very new in these editing kind of stuffs and you helped me alot. Besides, make sure to close all the programs on the backgorund next time and run it smoothly. Keep it up.
No worries Harry, it’s not something I would use a lot, nowhere as much as I remove backgrounds, but it nice to know it’s there when I need it.
That’s pretty cool. I’ve used a background removal before, but removing objects has been pretty difficult. Love this & I’ll have to check that software out.
Hey Bobbi, welcome to WassupBlog. I use Inpixio more for background removal as I use those images in my posts, for my thumbnails as well as in my videos. It saves me a lot of time as I used to spend hours on the net looking for stuff that usually wasn’t available anyway. It’s nice to know that it handles the object removal as well.